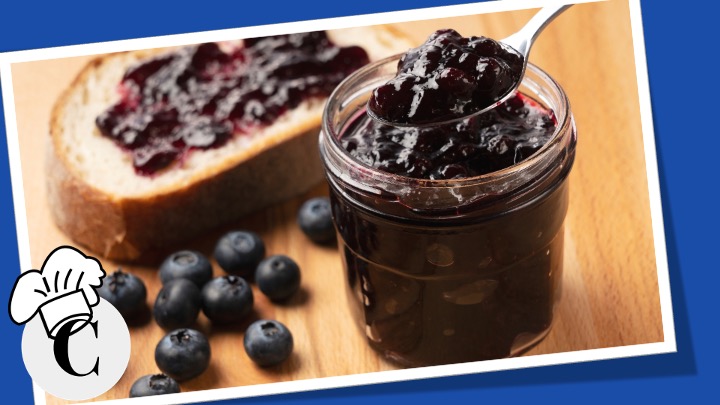
Cooking Lessons for Dad

Cooking Lessons for Beginners

  • Home
  • About
    • Kitchen Basics
  • Recipes
  • Cooking Videos
  • Contact Me
  • Cooking Courses
    • Learn to Cook the Easy Way
    • Easy, Healthy Crockpot Cooking
    • Easy, Healthy Sweets and Desserts

Blueberry Chia Jam

July 23, 2024 by Karen Breyer Leave a Comment

Blueberry Chia Jam

Blueberry Chia Jam

Ingredients

  • 2 cups blueberries, fresh or frozen
  • 1 - 2 tablespoons honey
  • 2 tablespoons chia seeds

Instructions

    1: Add the blueberries and honey to a saucepan over medium heat.
    2: Cook, stirring occasionally, until the blueberries start to break down and release their juices (about 5 - 10 minutes).
    3: Mash the blueberries with a fork or potato masher to your desired consistency.
    4: Stir in the chia seeds. Reduce the heat to low and cook another 5 minutes, stirring frequently, until the mixture thickens.
    5: Remove the saucepan from the heat and let the jam cool for a few minutes.
    6: Taste the jam and add more honey if desired.
    7: Transfer the jam to a clean glass jar or container and let it cool completely. Once cooled, cover the jar and refrigerate for 1 - 2 hours to allow the chia seeds to absorb the mixture and fully thicken the jam.

Notes

Use the Blueberry Chia Jam as a spread for toast, bread, pancakes, yogurt, oatmeal, peanut butter sandwiches, or desserts.
Make 2 - 2 1/2 cups of jam.

Make a delicious, healthy Blueberry Chia Jam recipe with three simple ingredients! In this cooking video, Karen Breyer will show you how to make Blueberry Chia Jam with blueberries, honey, and chia seeds. This easy recipe is perfect for spreading on toast or bread, adding to peanut butter sandwiches, mixing into yogurt, or adding a sweet touch to your favorite snacks. Not only is this jam quick to prepare, but it’s also free from preservatives and refined sugars, making it a wholesome addition to your diet. Watch this cooking video and learn how to create this tasty, nutritious Blueberry Chia Jam at home in no time!

Strawberry Shortcake

July 10, 2024 by Karen Breyer Leave a Comment

Strawberry Shortcake

Strawberry Shortcake

Ingredients

  • 2 cups whole wheat pastry flour
  • 2 teaspoons baking powder
  • 1/2 teaspoon Kosher salt
  • 1/3 cup coconut oil
  • 1/3 cup honey
  • 1 teaspoon vanilla
  • 2/3 cup soy or almond milk
  • For the Topping:
  • 4 cups strawberries, chopped
  • 1 tablespoon honey (optional)
  • 2 cups whipped cream (optional)

Instructions

    1: Preheat the oven to 400 degrees. Line a baking sheet with parchment paper or a silicone baking mat or spray it with cooking spray.
    2: Whisk the flour, baking powder, and salt in a mixing bowl.
    3: Melt the coconut oil in the microwave (about 30 seconds) or on the stove.
    4: Whisk together the warm coconut oil, honey, and vanilla until completely emulsified.
    5: Stir in the milk.
    6: Pour the wet ingredients into the dry ingredients. Stir until well combined. Be careful not to overmix.
    7: Drop the dough by large spoonfuls onto the baking sheet, forming into 8 equal portions.
    8: Bake for 17 - 20 minutes or until they are lightly golden brown.
    9: Toss the strawberries with honey while the shortcakes are baking.
    10: Top the shortcakes with strawberries (and whipped cream if desired) to serve.

Notes

The shortcakes are best eaten the day they are baked.
You can also split the shortcakes horizontally, place the bottom half on the plate, top with a spoonful of strawberries, add a dollop of whipped cream, and place the top half of the shortcake over the filling, serving immediately.

© Karen Breyer

Make a classic, delicious Strawberry Shortcake recipe with healthy ingredients! In this video, Karen Breyer will show you how to make fluffy, golden shortcakes with wholesome ingredients, topped with juicy strawberries and a dollop of fluffy whipped cream. This delicious dessert combines fresh flavors with a lighter touch, perfect for satisfying your sweet tooth in a nutritious way. This recipe will surely become a family favorite. Watch this cooking video and make this delicious, healthy Strawberry Shortcake recipe today!

Baked French Fries

June 23, 2024 by Karen Breyer Leave a Comment

Baked French Fries

Baked French Fries

Ingredients

  • 4 large Russet potatoes
  • 2 - 3 tablespoons high-heat cooking oil**
  • 1 teaspoon salt (or to taste

Instructions

    1: Preheat the oven to 425 degrees F.
    2: Line a baking sheet with parchment paper or a silicone baking mat.
    3: Wash and dry the potatoes.
    4: Cut the potatoes into 1/4 inch matchsticks*.
    5: In a large bowl, toss the potato strips with the oil and salt. Add additional seasonings if desired.
    6: Arrange the potato strips in an uncrowded, single layer on the baking sheet.
    7: Bake for 30 - 35 minutes, stirring around halfway through. Cook until golden brown and crispy.
    8: Let cool a minute or so before serving. If desired, serve with a dipping sauce of your choice, such as ketchup, mayonnaise, or a homemade sauce.

Notes

*To cut the potatoes into matchsticks:
1: Slice a thin piece off one side of the potato to create a flat surface.
2: Place the cut side down and cut the potato into thick slices about 1/4 inch wide.
3: Stack a few slices on top of each other. Slice through the stacks to create long, thick strips resembling matchsticks. Aim for consistent thickness.

Thicker fries will take longer to cook. The Skinnier one will cook faster.
**Choose an oil that can take a high heat, like grapeseed, canola, peanut, or avocado oil.
You can add additional seasonings, such as garlic powder, garlic granules, pepper, paprika, chili powder, or more.
No need to peel the potatoes unless you want to.
1 large russet potato is about 8—10 ounces.

© Karen Breyer

Craving crispy French fries but want a healthier option? In this video, Karen Breyer will show you step-by-step how to make perfectly Baked French fries at home in the oven. This easy, healthy recipe is a great alternative to the deep-fried version without sacrificing deliciousness.

Baking fries in the oven ensures they are lower in fat and calories, making them a guilt-free treat you can enjoy anytime. Perfect as a side dish, snack, or even a main course, these baked French fries will surely be a hit with everyone.

Not only are these baked French fries healthier, but they’re also incredibly easy to make. Karen will show you how to get a perfect crispy texture and suggest seasonings to suit your taste. Whether it’s a family dinner, a gathering with friends, or just a cozy night in, these Baked French fries are a quick, simple, and delicious option. Watch this cooking video and make some delicious Baked French Fries today!

Gnat Trap Recipe

May 29, 2024 by Karen Breyer Leave a Comment

Gnat Trap Recipe

Gnat Trap Recipe

Ingredients

  • 1/4 cup apple cider vinegar
  • 1 teaspoon of sugar
  • A few drops of dish soap
  • 1/4 - 1/2 cup warm water

Instructions

    1: Add the apple cider vinegar to a small container or bowl and stir in the sugar.
    2: Add a few drops of dish soap to the mixture.
    3: Gradually add 1/4 cup warm water.
    4: Stir the mixture so the sugar dissolves and the
    dish soap is evenly distributed.
    5: Stir in more water to achieve the desired
    consistency. The mixture should be liquid enough to
    release its scent into the air but not too watery.
    6: Cover the container with plastic wrap and secure
    it with a rubber band or tape.
    7: Use a toothpick or fork to poke several small
    holes in the plastic wrap.
    8: Place the trap in areas where gnats are present,
    such as near houseplants or in the kitchen.
    9: Check the trap regularly and empty it out as
    needed, replacing the vinegar mixture as it becomes
    full.

Notes

Adjust the amount of warm water based on your preferences and the trap's effectiveness. It
is best to start with smaller amounts of water and gradually add more until you reach the
desired consistency.
You can double or triple the recipe (or more) to make as many gnat traps as you like.
You don't have to put plastic wrap on the container; it will still catch gnats.

© Karen Breyer

Tired of pesky gnats buzzing around your home? In this video, you’ll learn how to make a quick and easy DIY solution to trap and eliminate gnats using simple household ingredients. This method is effective, affordable, and environmentally friendly! Follow along as Karen Breyer shows you step-by-step how to make this gnat trap that works!

Gnats can be a nuisance, especially during warmer months. Instead of using chemical sprays or expensive traps, create a simple and natural gnat trap with items you probably already have at home. Karen Breyer demonstrates how easy it is to set up this DIY gnat trap in just a few minutes. You’ll be amazed at how effectively it attracts and traps gnats, helping you reclaim your space. Say goodbye to gnats for good with this easy DIY gnat trap!

« Previous Page
Next Page »

Take our e-courses!

  • Learn to Cook the Easy Way
  • Easy, Healthy Crockpot Cooking
  • Easy, Healthy Sweets and Desserts

Categories

  • Appetizers
  • Beans and Legumes
  • Bread
  • Breakfast
  • Cooking Tips
  • Crockpot Recipes
  • Desserts
  • Dip
  • Entrees
  • Fruit
  • Kitchen and Cooking Tips
  • miscellaneous
  • Rice Cooker Recipes
  • Sandwiches
  • Sauces
  • Seasonings and Spice Mixes
  • Sharing Recipes
  • Side Dish
  • Snacks
  • Soup
  • Spreads
  • Toaster Oven or Regular Oven
  • Uncategorized
  • Vegetables

Legal

  • Anti-Spam
  • External Links Policy
  • Medical and Health Disclaimer
  • Privacy Policy
  • Terms of Service

Recent Posts

  • Spiced Winter Squash Pilaf with Raisins
  • Flax Whole Wheat Bread in a Bread Machine
  • Easy Creamy Garlic Potato Soup
  • Cranberry Fruit Relish
  • Savory Gravy

Find It Here!

Copyright © 2026 · Beautiful Pro Theme on Genesis Framework · WordPress · Log in