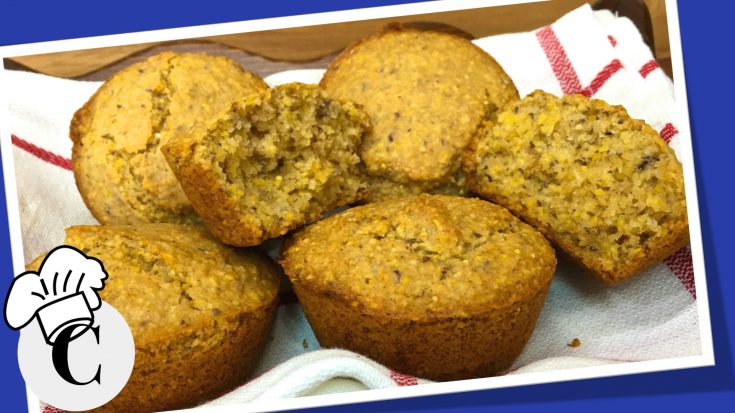
Cooking Lessons for Dad

Cooking Lessons for Beginners

  • Home
  • About
    • Kitchen Basics
  • Recipes
  • Cooking Videos
  • Contact Me
  • Cooking Courses
    • Learn to Cook the Easy Way
    • Easy, Healthy Crockpot Cooking
    • Easy, Healthy Sweets and Desserts

Crockpot Roasted Garlic

November 22, 2019 by Karen Breyer Leave a Comment

Roasting Garlic in a crockpot is super easy! Learn how to roast whole heads of garlic in a crockpot or slow cooker! Spread roasted garlic on toast, crackers or bread. Stir it into soups, pasta or mashed potatoes. It is very yummy as a spread on sandwiches. You can also dice the roasted garlic cloves and sprinkle them over pasta, pizza, vegetables or beans. Using roasted garlic is the perfect way to make healthy garlic bread or toast.

In this cooking video Karen Breyer will show you step-by-step how to make Crockpot Roasted Garlic. Watch this video and roast some delicious garlic cloves today!


Yield: 6 - 8 servings

Crockpot Roasted Garlic

Ingredients

  • 3 - 4 (or as desired) garlic bulbs
  • 1 - 2 teaspoons olive oil (per garlic bulb)
  • Kosher salt (to taste)
  • Pepper, fresh ground (to taste)

Instructions

  1. Cut a 1/4 to 1/2 inch slice from the top of the garlic bulbs. Cut off enough so the cloves are exposed.
  2. Carefully peel off the outer paper-like skin from the garlic bulbs. Leave enough to hold the cloves together.
  3. Place the bulbs in a glass bowl or small wide mouth jar. Use more than one bowl or jar as needed to fit the number of bulbs. Arrange the bulbs so they will stay upright.
  4. Drizzle 1 - 2 teaspoons of olive oil over each bulb.
  5. Sprinkle with salt and pepper.
  6. Cover the bowl with foil.
  7. Place the glass bowl on a trivet like a metal jar lid or canning ring so the glass is not touching the bottom of the crockpot.
  8. Cook on high for 1 1/2 - 2 hours or until the garlic is tender when pierced with a fork or toothpick.
  9. Squeeze the garlic out of the cloves. Sprinkle with more salt and pepper if desired.

Notes

Spread the creamy roasted garlic on toast, crackers or bread. Stir it into soups, pasta or mashed potatoes. You can also dice the roasted cloves and sprinkle over pasta, pizza, vegetables or beans.

Instead of roasting the garlic in a glass dish you can wrap each bulb tightly in foil.

© Karen Breyer


Roasted Butternut Squash

November 12, 2019 by Karen Breyer Leave a Comment

Learn how to Roast Butternut Squash! Butternut squash is a winter squash with a nutty, sweet flavor. Roasting Butternut Squash brings out it’s delicious rich, nutty sweet flavor even more! In this cooking video Karen Breyer will show you step-by-step how to make Roasted Butternut Squash. Watch this cooking video and make some delicious Roasted Butternut Squash today!

Yield: 4 - 6 servings

Roasted Butternut Squash

Ingredients

  • 6 - 8 cups butternut squash, 1 inch cubes
  • 1 - 2 tablespoons grapeseed or olive oil
  • 1/2 teaspoons Kosher salt
  • 1/4 teaspoon ground black pepper
  • Baking spray (or use parchment paper)

Instructions

  1. Preheat the oven to 400 degrees. Line a baking sheet with parchment paper or spray with baking spray.
  2. In a large bowl, mix together the butternut squash and oil.
  3. Stir in the salt and pepper.
  4. Spread the butternut squash in a single layer on the baking sheet.
  5. Roast for 20 minutes. Turn and roast 10 to 15 minutes more until the butternut squash is tender. A knife should slide easy into the center of the squash when it is done.
  6. Add more salt and pepper to taste. Serve.

Notes

Butternut squash is a winter squash with a nutty, sweet flavor.

6-8 cups of diced butternut squash is about 3 pounds.

You can make the butternut squash cubes bigger or smaller than 1 inch. Just make them about the same size. Bigger cubes will take longer to cook. Smaller cubes will cook faster.

You can add other seasonings if desired. Try brown sugar, maple syrup or herbs.
To cut a whole butternut squash into 1 inch cubes: Peel the squash, cut it in half, scoop out and discard the seeds. Then dice the squash into 1 inch cubes or the desired size. Larger cubes will take longer to cook. Smaller cubes will cook faster.

© Karen Breyer


How to Peel and Cut a Butternut Squash

November 6, 2019 by Karen Breyer Leave a Comment

Want to learn how to peel and cut a butternut squash? In this cooking video Karen Breyer will show you step-by-step how to Peel and Cut a Butternut Squash into cubes. Your butternut squash cubes will be ready for your favorite butternut squash recipe.

My favorite way to cook butternut squash is roasting. What is your favorite butternut squash recipe? Whatever it is, watch this cooking video and learn how to peel and cut a butternut squash so you can make that favorite recipe!

Yield: Varies

How to Peel and Cut a Butternut Squash

Ingredients

  • A Whole Butternut Squash

Instructions

  1. : Rinse and pat dry a whole butternut squash.
  2. : Cut the stem and bottom ends do both ends are flat.
  3. : Cut the squash in half between the neck and the bulb.
  4. : With a regular and/or y-shaped vegetable peeler, peel away the skin. Also peel away any green streaks so you have only vibrant, orange flesh.
  5. : Cut the bulb side in half lengthwise. Scoop out the seeds and stringy fiber.
  6. : To make 1 - inch cubes, cut each half in 1 inch slices. Then cut each slice lengthwise in 1 inch strips. (Adjust the cuts to make your desired size cubes).
  7. : Turn and cut across the strips so you have 1 inch cubes.

Notes

Butternut squash is a winter squash with a nutty, sweet flavor.

The y-shaped vegetable peeler makes it easier to peel on some of the more curvy areas. A regular, straight peeler is easier on other areas. Use what is easier for you.

Adjust your cuts to make any size butternut squash cubes you desire.

© Karen Breyer


Vegan Cornbread

November 3, 2019 by Karen Breyer Leave a Comment

I think this is the best vegan cornbread recipe ever! This is my favorite cornbread recipe, either vegan or non-vegan. It is so delicious everyone will love this it! This cornbread is simple to make and uses easy to find ingredients. In this cooking video Karen Breyer will show you step-by-step how to make this delicious Vegan Cornbread recipe!

If you are looking for an easy, healthy, homemade cornbread recipe I think this one is perfect for you. Both vegans and non-vegans will love this delicious cornbread. Watch this cooking video and make this tasty Vegan Cornbread recipe today!

Yield: 12 - 16 servings

Vegan Cornbread

Ingredients

  • 3/4 cup whole wheat pastry flour
  • 1/2 cup white all purpose flour
  • 1 cup cornmeal, yellow or white
  • 1/2 cup sugar, granulated
  • 1 teaspoon Kosher salt
  • 1 tablespoon baking powder
  • 1 1/4 cup almond milk, unsweetened
  • 1/3 cup grapeseed or canola oil
  • 3/4 cup frozen corn, yellow or white (thawed) - optional
  • 3 tablespoons mild green chilies, drained (canned, diced) - optional
  • Cooking Spray

Instructions

  1. Preheat the oven to 400 degrees.
  2. Spray a 9 x 9 pan or 9 inch round pan with cooking spray.
  3. In a large bowl, mix together the whole wheat pastry flour, white flour, sugar, salt, and baking powder.
  4. Stir in the almond milk and oil. Mix until well combined.
  5. Stir in the corn and green chilies.
  6. Pour the batter in the pan.
  7. Bake 20 - 25 minutes, until the edges start to brown and a toothpick inserted in the center comes out clean.

Notes

If you don’t have Kosher salt you can use another type.

You can adjust the proportions of all purpose flour and whole wheat pastry flour. They need to equal 1 1/4 cups in total. If you add more white flour and less wheat the corn bread will be more fluffy. If you add less white and more wheat the cornbread will be more dense.

You can replace all or part of the oil with applesauce.

You can reduce the sugar to 1/3 cup for less sweetness.

You can use drained, canned corn in place of frozen.

This cornbread is delicious both with and without the corn and green chilies.

© Karen Breyer


« Previous Page
Next Page »

Follow Me :)

Facebook
fb-share-icon
Twitter
Post on X
RSS
Follow by Email

Take our e-courses!

  • Learn to Cook the Easy Way
  • Easy, Healthy Crockpot Cooking
  • Easy, Healthy Sweets and Desserts

Categories

  • Appetizers
  • Beans and Legumes
  • Bread
  • Breakfast
  • Cooking Tips
  • Crockpot Recipes
  • Desserts
  • Dip
  • Entrees
  • Fruit
  • Kitchen and Cooking Tips
  • miscellaneous
  • Rice Cooker Recipes
  • Sandwiches
  • Sauces
  • Sharing Recipes
  • Side Dish
  • Snacks
  • Soup
  • Spreads
  • Toaster Oven or Regular Oven
  • Uncategorized
  • Vegetables

Popular Posts

  • Toaster Oven Sunny-side Up Eggs
  • Parmesan Baked Zucchini Boats
  • Frozen Vegetables in a Toaster Oven
  • Rice Cooker Italian Polenta
  • Toaster Oven French Toast
  • Toasted Almonds
  • Spanish Rice in a Rice Cooker
  • Vegan Instant Chicken Broth/Seasoning
  • Toaster Oven Brown Rice
  • Pineapple Orange Sauce

Legal

  • Anti-Spam
  • External Links Policy
  • Medical and Health Disclaimer
  • Privacy Policy
  • Terms of Service

Recent Posts

  • Dry Bread Crumbs
  • Honey Butter
  • Fluffy Whole Wheat Bread in a Bread Machine
  • Rice Cooker Breakfast Quinoa
  • Rice Cooker Red Lentils and Rice

Find It Here!

Copyright © 2025 · Beautiful Pro Theme on Genesis Framework · WordPress · Log in